Configuration Menu
The autoresponder drop down menu gives you several settings you can configure for this autoresponder.
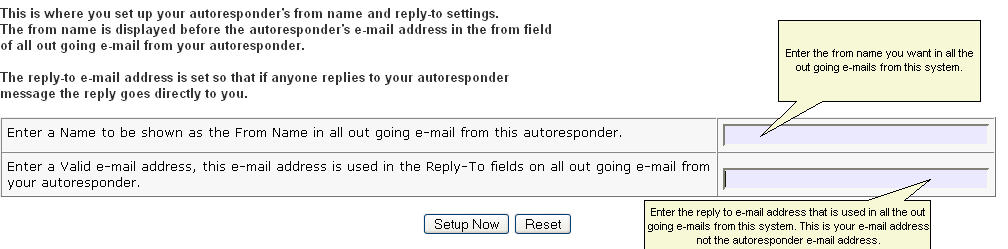
1. Autoresponder From Setting: This allows you to change the autoresponders from settings.
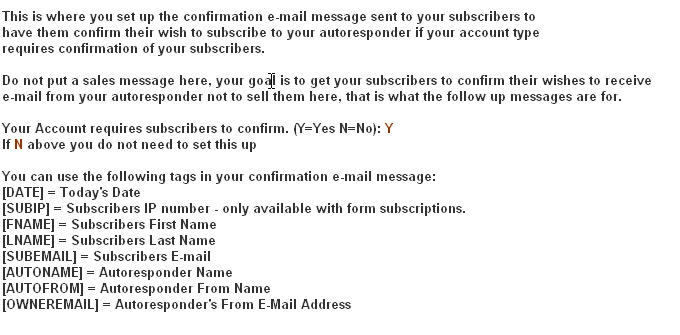
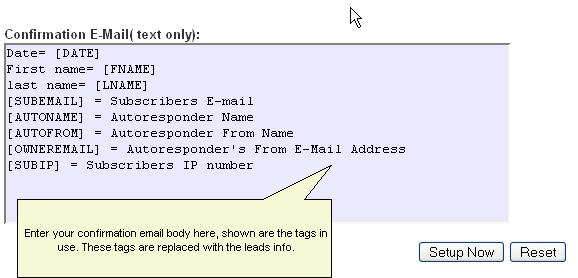
2. Confirmation E-Mail Message: This allows you to set up your confirmation e-mail body that is sent to all new subscribers if you are required to use confirmed opt-in. Use this e-mail to get the lead to confirm their wishes to subscribe to your autoresponder.
Do not try to sell them here or include any links to your site here, doing so will get you accused of spaming.
There are several tags you can use to personalize this message.
3. Campaign Setting: This allows you to have all the subscribers that have finished the messages in this autoresponder to automatically roll over to another autoresponder in this account and start receiving the messages from that autoresponder.
Just select the autoresponder you want them moved to from the drop down list.
4. Custom Personlization Tags: You can have up to 50 custom tags that you per define teh value for. These tags can be used in all messages sent from this autoresponder.
Hint: Many use these for affilite URL's , web site URL's etc.
5. Custom URL Tags: You can have up to 50 custom URL tags. These tags can be use to store URL's or anything you may need a custom tag for.
These tags can be used in all out going messages from this system.
6. E-Mail Header and Footer: This is where you can set up a header and footer that is put into all outgoing e-mails from this autoresponder. Simply enter what you want in each and save.
The Personalization tags can be used in both.
7. Signup Success Redirect: Enter a URL ( your web page) that you want to send the subscriber to when they have confirmed if confirmation is used or when they have signed up if it is not used.
This will send them to the URL you enter and pass along their first name, last name and e-mail address that you can use to personalize the landing page. If you do not enter anything here the susyems default will be used.
To personalize the landing page, make a php page with just HTML and where you want the name and e-mail address use this < ? print "$fname"; ? >, < ? print "$lname"; ? > and < ? print "$lemail"; ? >. Remove the spaces between the < and the ? on both ends when you use.
8. Confirmation Required Redirect: Enter a URL you want to send those subscribers that must confirm their wishes to be on your list. This allows you to have a customized landing page instead of the system default.
Again the names are pasted along and can be used as in section 7 above.
9. Custom Questions: You can set up custom questions to use in your forms, when the subscriber answers the questions they are stored for that subscriber, you then can do a mailing based on if they answered the question.
You can add, edit and reset the custom questions from this section.
10. Setup/ Edit Demographics: This is where you can set up demographic questions and the answer set for each to be use on your forms. When the subscriber answers the question it is stored and you can later use the stored data to send mail to your subscribers based on the question answered and the answer given.
11. Setup a reminder that will be e-mailed to you on the date you selecet. You can set up a reminder to be sent for any day in advance on the day you set it up.
Use these reminders to send you an e-mail abount important things you need to remember.
12. Edit Reminders: Here you can edit a reminder you have set up or delete it.