Subscriber Menu
The Subscriber Menu gives you several options to view, manage, import, delete and edit your subscribers.
1. View Active Subscribers: Allows you to see and manage all your active subscribers. You can edit the subscriber info, move the subscriber to another autoresponder in this account.
This is also where you can add a note to be stored for a subscriber if you wish.
You can also group edit your subscribers here, delete the group,move the group or reset the next message to be received for the group:

2. View Pending Subscribers: This list all your pending subscribers, pending subscribers are those that have not confirmed if your account required confirmed opt-in.
3. View Deleted Subscribers: This list all your subscribers that have been deleted from this autoresponder. Deleted subscribers can be those that removed themselves, you deleted or were removed by the system admin at the request of the subscriber.
4. View Bounced Subscribers: This list all your subscribers that have had more than 2 e-mails to them bounce back to the system. There are many reasons why they may have bounced, filters, bad address, abandoned address or a full e-mail box they never check.
Remember ISP's filter on many things, key words in the body and subject of your e-mails, URL's in your e-mails, spam complaints, you will need to really look to find out why a e-mail bounced.
5. Add Single Subscriber: This is where you can add a single subscriber to your autoresponder, just fill out the form and click Add now.
6. Import Subscribers By CSV: You can import leads into your autoresponder by a CSV file, make sure that there is only one leads data per line in the CSV file. You will need to map the import file, show here:

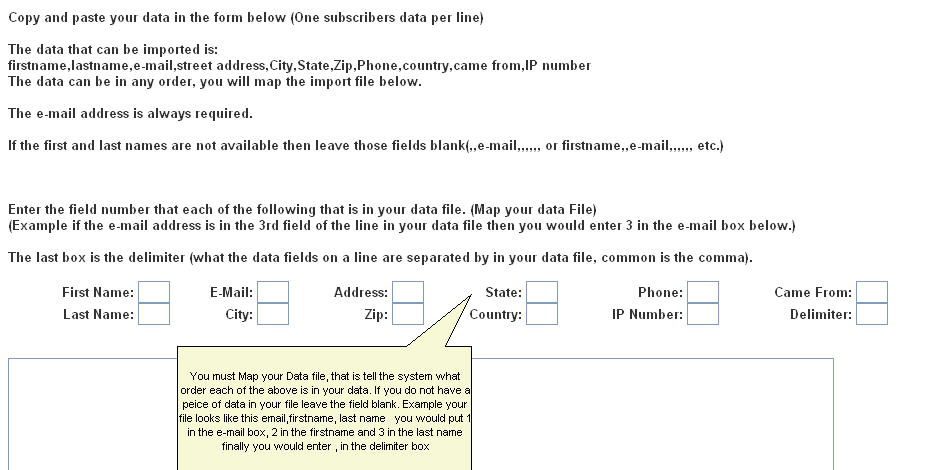
7. Import By Form: Here you can import your leads by pasting them in to the form provided, each leads data must be on one line. You will also need to map the import just as the CSV import, this tells the system in which order your data is in:

8. View By Next Message Due: Here you can view your subscribers by the next message they are due to receive. You can also edit and group edit the subscribers that are list here.
Select what to sort the display on via the drop down list and enter a message number due to have the list displayed by, the default is to display the subscribers that are due message 1:

9. View By Custom Questions: Here you can list your subscribers by any question questions they have answered, just select the question from the drop down menu and any subscriber that answered that question will be listed.
10. View By demographic
Questions Answered: Here you can list your subscribers by any demographic
question question they have answered, just select the question from the
drop down menu and any
subscriber that answered that question will be listed along with their answer.
11. Ban Subscribers: Here you can ban a single or a list if subscribers by entering the e-mail address or address's you want to ban from subscribing to your autoresponder.
12. List/Edit Banned Subscribers: Here you can list all the banned subscribers you have entered, you can also select to remove them from your ban list.
13. Ban Domains: Here you can enter a domain name or a list of domain names to ban from subscribing to your autoresponder, any email address at any domain you add will not be able to subscribe to your autoresponder.
14. List/ Edit Banned Domains: Here you can see a list of the domain you have banned, you can also remove any domain you have listed here.
15. Backup Subscribers: This is where you can generate a backup copy of your active subscriber list and all their custom question and demographic answers. This will create a comma delimited file for you to download to your PC. Just follow the online instructions to back up your data.